عرض العناصر حسب علامة : power point
الثلاثاء, 29 مارس 2022 08:02
كيفية تكبير جزء من شريحة أثناء العرض التقديمي

هل رغبت في أن تتمكن من التكبير وعرض شيء ما على شريحتك بمزيد من التفصيل؟ إذا كنت مشتركًا في Microsoft 365 تستخدم إصدار Windows من PowerPoint، فلديك هذه الميزة!
معلومات إضافية
-
المحتوى بالإنجليزية
June 8, 2021
Use the Camera tool in Excel to create dynamic screenshots
February 9, 2021
Various ways to display formulas in Excel
TOPICS
Technology
How many times during a PowerPoint presentation have you wished that you could zoom in and show something on your slide in more detail? If you are a Microsoft 365 subscriber using the Windows version of PowerPoint, you have that feature!
If you are presenting with just one screen, here are the steps to magnifying part of the slide on the screen:
1. In the lower right corner of your PowerPoint slide, click Slide Show view to start your presentation.
slide-show-view
2. When you are ready to zoom in on a slide, click on the magnifying glass icon in the lower left corner of the presenter view.
zoom-view
A lighter rectangle will appear on the slide. Point your mouse to the area of the slide you want to magnify and click. That part of the screen will be enlarged. You can toggle the magnifier on and off by clicking on the magnifying glass icon. You can also press the Esc key to exit from the magnified view.
Here is a quick video showing another way to access the feature if you are presenting using two screens.
Being able to zoom in on detail on slides is useful, especially when you have calculations that you want to emphasize. Give it a try — it is a handy trick to know.
نشر في
موضوعات متنوعة
الأربعاء, 23 مارس 2022 09:33
كيفية استخدم أداة الكاميرا في Excel لإنشاء لقطات شاشة ديناميكية
تتيح لك أداة الكاميرا في Excel التقاط صورة لجزء من ورقة العمل ولصق تلك الصورة في أي مكان في المصنف الخاص بك. يمكنك بعد ذلك تنسيق اللقطة الملصقة وتغيير حجمها باستخدام أدوات الصورة. يمكنك أيضًا نسخ اللقطات ولصقها في مستندات Word وPowerPoint.
معلومات إضافية
-
المحتوى بالإنجليزية
April 13, 2021
See descriptive statistics in Excel
December 8, 2020
Use VLOOKUP to help manage your gradebook
TOPICS
Accounting Education
Technology
Microsoft Excel
The Camera tool in Excel allows you to take a picture of some part of a worksheet and paste that picture anywhere in your workbook. You can then format and resize the pasted snapshot using picture tools. You can also copy and paste the snapshots into Word and PowerPoint documents.
The Camera tool has many uses. You can use it to easily resize charts, for instance. Or, if you are creating an Excel dashboard, you can use it to display part of a table, PivotTable, or chart in your dashboard, changing the size of your screenshot to display as much or as little information as you choose.
When the underlying data changes for a picture you took with the Camera tool, the screenshot will update as well. That means when you are working with one worksheet, you can use Camera to view a dynamic picture of data from another worksheet within it. For instance, perhaps changes in formulas in Sheet1 cause changes in values in Sheet2 and you would like to see those changes as you work. In this case, you can take a snapshot of the data in Sheet2, paste it into Sheet1, and watch how it changes as you alter the formulas in Sheet1.
Adding the Camera tool to Excel
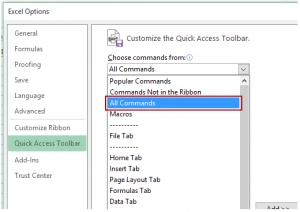
The Camera tool is not available by default, so you need to enable it. To do so, right click on the Quick Access Toolbar in Excel and select Customize Quick Access Toolbar. Then make the following choices in the dialog box that appears:
In the Choose Commands from box, select All Commands from the drop-down menu.
Scroll down the list below the drop down and select the Camera tool.
Click Add>>.
Click OK.
The Camera tool will now be available in your Quick Access Toolbar, located above or below your Ribbon in Excel. Here it is pictured below the Ribbon:
Camera tool
How to use the Camera tool
To use the camera, select the portion of the worksheet that you want to take a snapshot of, and click the Camera button on the Quick Access Toolbar. To paste the image, left-click the area where you would like the snapshot placed. You can move the snapshot by dragging it; you can also resize it.
نشر في
موضوعات متنوعة
موسومة تحت